Categories
Strength Training Uncategorized

Are Machines that Bad?

In the world I’ve grown up in, I’ve learned that WORKOUT MACHINES ARE BAD!

However, I’m also aware that If I had grown up 20 years ago, I would have learned that machines are the way to go. After working with a different demographic, and being introduced to a new style of training than what I’m used to, I really do believe that there is a place for machines in strength training.

But first – here are some reasons why I always thought (and some are still true) think machines are “bad” to use.

  • Limited Range of Motion (You are limited to the range that the machine allows)
  • They Don’t Integrate Your Core
  • They Don’t Exercise The “Small” Supporting Muscles

For most trainers, from a GPP (General Physical Preparedness) Standpoint, machines sound terrible from those 3 bullets above! And just a week ago, I thought the same thing. After working with multiple people above their 70’s and 80’s in age this week, I’ve come to understand that there is a use for machines. Let’s attack those three bullet points and create a counter-argument for each.

Limited Range of Motion – Range of Motion may be limited, but machines are extremely effective at isolating a muscle. If you’re a bodybuilder, or using machines as a supplementary exercise to other full range of motion exercises, there is no reason you shouldn’t use machines.

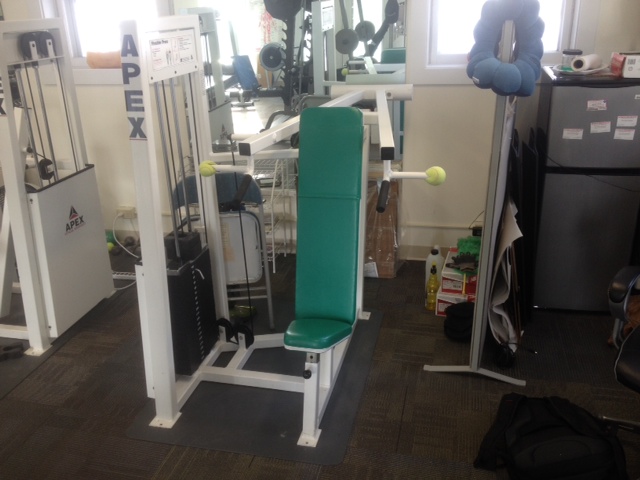
Here’s an example: One of the machines I’ve been using is the Apex Vertical Row. It trains the same path of motion every time, but it works the shit out of my lats! I’ve been integrating it into my own personal workouts and absolutely love it! I use pull-ups, pullovers, and straight-arm pulldowns to supplement the Vertical Row Machine.

They Don’t Integrate Your Core – I remember reading some work by Paul Chek, and he mentioned that anytime you are holding onto a fixed object, it automatically takes stress off of your core (which makes sense). So, going along with Paul Chek’s statement, and what I also believe to be true, machines take the “demand” away from the core. This could be very beneficial, in a few ways.

shoulder press machine

One way is if someone has an abdominal injury, and they want to limit the use of it, but still want to strengthen their other muscles.

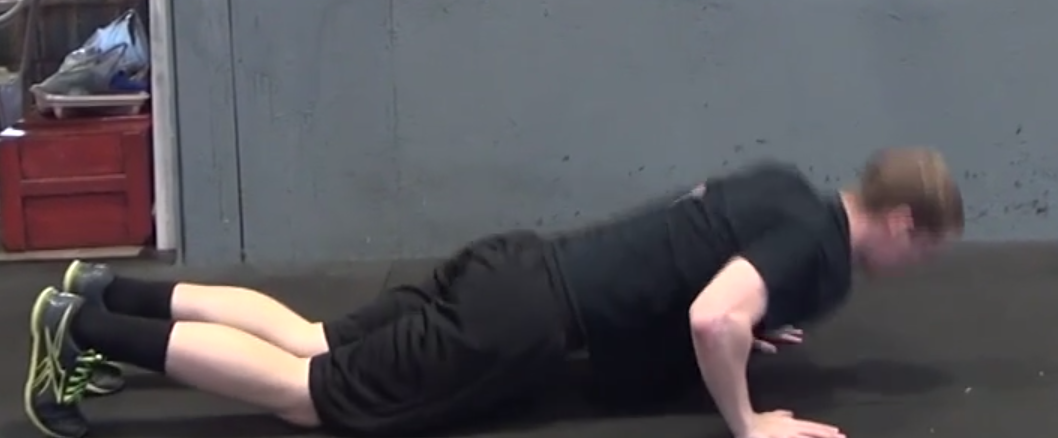
Another way is if someone’s core is too weak to support overhead or free weight movements. This directly applies to me, because I often have to stop my Barbell Shoulder Presses due to a lack of strength in my core, not my shoulders! Because my core can’t support the weight overhead, I tend to arch my back and that’s when back problems happen. This leaves me with a few options. I can:

  • Strengthen my Core
  • Lower the Weight
  • Isolate my Shoulders on a Machine While I Simultaneously Strengthen my Core to Support Weight Overhead

I personally like the third option because it allows me to get stronger in both muscle groups at the same time. It’s annoying to wait for weaker muscles to catch up, and who want’s to lower the weight? Not me! Machines can help you break through plateaus due to weak abdominals, and help you prevent injury. However, this is not an excuse to just train your shoulders and not your core. That would ultimately be making the problem worse!

They Don’t Exercise The “Small” Supporting Muscles

This part depends all upon you or your client’s goals. Machines do add a huge amount of stability to exercises, making the exercises in the gym safer, but this can lead to injuries in day to day life. If you’re training someone who is into changing their physique, and you plan on using machines, I suggest isolating muscle groups and then integrating them into a dynamic exercises with free weights – even if the load is low.

For example, you could use the Shoulder Press Machine to isolate your shoulders, and then grab some bands to perform some external rotations to work your rotator cuffs. Doing a DB Shoulder Press, Incline DB Bench, or Push Press would be good choices for “integration exercises” in this case. Your workout could look like this:

A1.) Barbell Push Press 2×15

A2.) Shoulder Press Machine 2×8-12

A3.) External Rotation 2×10-15 reps / side

Benefits of Machines

“Wait, there are actually some more benefits to machines?” I believe so, but you have to look at the “big picture”.

Intimidation

Some people are extremely intimidated by free weights, and will never change. There are more of these people than you think. You don’t see them because they’re not in the gym. They see CrossFit workouts and are scared to death! Using machines for strength training are better than nothing, and can definitely improve someones health and lifestyle if done correctly. If it comes down to not working out or machines, use machines.

In the past week, I’ve worked with people ages 45-87. As expected, those who are younger have been much more open to using free weights than the older clientele. There is much less “risk” associated with using machines, and I can understand where they older crowd is coming from. I still believe there is a place for free weights even with older clients, but again, as you get older, we’re not training for performance (in most cases!). Our goal is to help prevent future injury, maintain bone structure, muscle mass, and strength.

Drop Sets

Drop sets are so easy with machines! You just pull the pin out, and stick it in another weight. It’s extremely effective! It’s also a lot safer to go to failure with machines… although that won’t stop me from maxing out my Barbell Back Squat when I’m the only one in the gym 🙂

Conclusion

I believe there is a time and place for both machines and free weights, and there is no reason to be an all or nothing trainer when it comes to either one. You can use the above to help form your own workout and decide how you want to use free weights vs machines, or, if you’re looking for a workout already written out and done for you, you can check out my Accelerated Strength Training System.

ASTv1 Thumbnail

It provides a full workout manual and step-by-step tutorial videos on how to perform every exercise required. Right now, you can also get my Full Nutrition Guide, the Hybrid Athlete Nutrition System along with it, for a very affordable price!


Categories
Uncategorized

Causes for Wrist Pain in the Front Squat

Do you have wrist pain during the front squat? Is it stopping you from adding more weight to the bar, completing other exercises proceeding the front squat, and even affecting you in other lifts like the Squat clean? If it is, this blog post will insight you on the potential causes of your pain, and how to self-diagnose yourself so that you can finally find out where the pain is rooted. Knowing this will be the first step to finally fixing your nagging wrists.

Wrist pain during front squats or any other “rack position” movement can really set you back in the CrossFit world. Casual CrossFitters will find that their overall fitness improvements will be hindered, and Competitive CrossFitters won’t be able to place nearly as high in competitions. The pain can really slow you down, and even cause injury elsewhere in the body!

It’s always important to get to the source of the problem – so here are the most common injuries or problems you may have going on that are causing your wrist pain.

1. Prior Wrist Injury (Tendinitis, Sprain, or Fracture)

Obviously, if you have previously injured your wrist, whether that be in the 2 weeks ago or 2 years ago, the wrist is a funky joint and can leave you with pain during this movement. Here’s how you can narrow it down to see if you have any of these injuries.

Wrist Sprain – This can be caused by hitting, twisting, or falling on your wrist. If the pain only comes when you move your wrist, and you’re certain your wrist isn’t broken, you might have wrist sprain.

Wrist Tendinitis – If you’re pain comes during or after multiple reps of burpees, you may have wrist tendinitis. Overuse and Overload are both common causes of tendinitis. (These can both be due to “weak point”, and can be fixed by strengthening and stretching of the correct muscles.)

Broken Wrist – If you twisted, hit, or fell on your wrist, and the shape of it has changed, you’ll want get it checked right away. It may be broken.

2. Incorrect Form

A lot of the time, positioning the bar in the wrong place, or gripping the bar the wrong way will put much more stress on the wrists than are needed. Even if you have flexibility or mobility issues, there are still some adjustments you can make to help you out.. By correcting your form (if it was already incorrect), you can sometimes instantly reduce or get rid of your wrist pain.

3. Flexibility or Mobility Issues in your Wrists, Triceps, Shoulders, and Upper Back

Sometimes incorrect form is actually caused by flexibility or mobility issues in these three areas. There are TONS of exercises you can do to improve your flexibility and mobility, so over time you’ll be able to move yourself into the correct range of motion for this movement.

4. Sensitive Ulnar Nerve

There is a nerve that runs along the inside of your forearm and down the wrist that can cause you pain if it is compressed too much. You can test to see if you have this problem by putting your arms in the front squat position (bent elbows and palms facing the ceiling) and rest your fingertips on your shoulder. Now take one of your hands, and pull back slightly on your fingers. Do you feel any sharp pains there running down your forearm? If you do, you may want to get that checked out by a healthcare professional.

Once you finally figure out what you think is causing your wrist pain from the tests above, you can do proper research, or contact a medical professional (recommended) to design a plan that will help you move forward. Although this blog post did teach you how to self-diagnose a potential wrist injury, it’s always important to get a second opinion from an expert.

Categories
Uncategorized

What Happens If I Tear My ACL?

This article is going to briefly cover what goes on during the rehab process of a torn ACL after surgery. If you have just torn your ACL, this article can be used to give you an idea of what you can expect for the following months.

(Step 1) Immediately After Surgery

The Journey Begins With Rest

After your surgery, it is considered standard protocol to leave the hospital with your knee in the fully extended position. You will want to do your best to limit and motion or bending in the knee for first five days. These 5 days should include bracing and icing.

(Step 2) 5 Days Post Surgery

Increase Your ROM (Range of Motion)

After Step one of resting, icing, and bracing, you will want to do your best to regain full range of motion. There are a number of different ways to do so, much you must be very careful in these beginning stages. Pushing too hard, through pain, or doing exercises incorrectly can be very counter productive and harmful, potentially setting you back rather than speeding up your recovery.

Do not attempt to walk on your leg without crutches until you are able to walk normally without any limping or dysfunction. As a good reference for you, a third party should not be able to notice that you have any problem or trouble with your knee when you walk. You can expect to be walking normally after a month post surgery, give or take. If you do not reach this point by the one month mark, DO NOT push harder. Everyone is different genetically and recovery times will vary because of this. I’ll remind you that pushing too hard can cause your recover to move slower.

(Step 3) Strengthening

Quads, Hamstrings, Hips, and Core

As swelling begins to decrease, and your range of motion increases, you will want to begin strength training of the lower body, specifically around the quadriceps, hamstrings, hip stabilizers, and core to support your knee joint. The exercises you perform should consist only of closed-chain exercises, which mean your feet are planted on the ground when the exercise is performed. You may also begin low impact exercise like spinning – and gradually move to the elliptical.

One of the biggest struggles you will have in your rehabilitation process is to regain the strength of your quadricep muscle (the muscle directly above the knee cap on the front side of your leg). Because your leg was extended for such a long time and limited the range of motion to this muscle, it naturally atrophies (becomes smaller) and loses it’s strength. One of the main goals in your rehabilitation in your rehabilitation program should be to regain strength here.

NOTE: If you try to ever push through pain, your knee and quad will begin to swell and your quad will begin to lose function again, and causing it to atrophy once more. This is moving backwards in the rehabilitation process, and exactly what you want to avoid. I will stress this again – you cannot push through pain in an ACL repair so do NOT do so.

Running should not be attempted until the muscles listed above (quadriceps, hamstrings, hip stabilizers, and core) can fully support the knee. If you try to run when the muscles don’t support the knee, pain and swelling will return. Typically, it takes 3-4 months of strengthening the quadricep muscle before it is strong in enough to begin running. (See “Fast Knee Rehab ACL Survival Guide” for Tests to see if you’re ready to run)

Running

3-4 Months Post Surgery

You should engage in low-intensity agility exercises to warm up before you begin your running. These exercises can consist of light jumping, skipping, and shuffling. Just like everything else, you can progressive increase the intensity of these exercises as your supported muscles strengthen. If you’re an athlete, this is a time you can eventually start to implement sport-specific exercises.

When you begin to run, start out by just moving a minute or two at a time. You want to keep your speed around 5-6mph, and it’s okay to be flexible with this because like I said, every person is different. If you are able to go longer without difficulty, you can do so. If you feel it’s too difficult, you can go for a shorter duration. If you feel pain or start to swell, it’s time to untie the laces and take a break.

(Step 4) Regain Confidence

Get back to what you love

As your able to run for longer periods of time, and progress in your warm up exercises, you can eventually move to sport/activity specific exercises. These are extremely beneficial because it helps reactivate the old neuromuscular pathways that were used in previous sports. Once you reach this point, you are well on your way to recovery, and the feeling of getting back to your sport, with less intensity of course, is extremely exciting and fulfilling.

Categories
Uncategorized

How to Prevent Wrist Pain During Burpees

Are you having trouble pumping out those burpees during your Workout of the Day because of nagging wrist pain? If you are, then you’re in the right place. In this article you’ll learn:

  1. How this wrist pain is holding you back
  2. Why you have wrist pain during burpees and what you need to fix it
  3. 3 Action Steps you need to take TODAY to get rid of the pain and stop further damage

Wrist pain during burpees, as you have experienced, can be a huge setback whether you’re trying to get in an effective cardio workout, push through the casual Crossfit WOD, or compete in CrossFit. It’s important to note that if you aren’t already, you will soon compensate for this pain. You will learn to work around it, favoring another part of the body. This is where bad form and habits can be developed, that may lead to injury elsewhere in the body. If you are a casual exerciser or CrossFitter, not being able to do burpees will slow down your cardio workout, not allowing you to beat previous records or meet your fitness goals as fast as you would otherwise. Competitive CrossFitters, without a pain-free burpee, you won’t be able to plow through the grueling workouts that the Open may throw at you. Remember the Open WOD 13.1?

Proceed through the sequence below completing as many reps as possible in 17 minutes of: 40 Burpees 75 pound Snatch, 30 reps 30 Burpees 135 pound Snatch, 30 reps 20 Burpees 165 pound Snatch, 30 reps 10 burpees 210 pound Snatch, as many reps as possible

That’s a lot of burpees…

But before we get started, here’s a list of injuries that you may or may not have.

Here are some common injuries that you should watch out for:

Wrist Sprain – This can be caused by hitting, twisting, or falling on your wrist. If the pain only comes when you move your wrist, and you’re certain your wrist isn’t broken, you might have wrist sprain.

Wrist Tendonitis – If you’re pain comes during or after multiple reps of burpees, you may have wrist tendonitis. Overuse and Overload are both common causes of tendonitis. (These can both be due to “weak point”, and can be fixed by strengthening and stretching of the correct muscles.)

Broken Wrist – If you twisted, hit, or fell on your wrist, and the shape of it has changed, you’ll want get it checked right away. It may be broken.

Sometimes, a lack of mobility and flexibility in upper body can cause wrist pain, but chances are, you have one of the first two injuries. If you have a wrist sprain, there are certain modifications you can make to your exercises, as well as some different tools and braces you can use to relieve the pain temporarily. If your have wrist tendonitis, there’s a lot you can do to sometimes completely remove the pain. You’ll want to work on strengthening and stretching the right muscles, improving your form in exercises, and reducing inflammation (eating correctly, using anti inflammatories).

So let’s look at one potential cause for your pain. Your form during the burpee exercise.

While the burpee is a very complex movement involving the entire body, it can be broken down into simple steps so that we can locate the cause of your wrist pain.  By seeing this exercise in steps, you may be able to figure out for yourself exactly where the pain is coming from.

Step 1: Start in An Upright, Standing Position

Burpee

Step 2: Crouch (Perform a Quarter-Squat)

Burpee

Step 3: Shift Weight Forward

How you position your hands, elbows, and shoulders during this step can make a big difference in the pain you feel (since a lot of pressure is placed there)

Burpee

Step 4: Kick Your Feet Back Into A Pushup Position*

If you’re unable to hold your wrists at the range of motion shown below without pain, you most likely have mobility issues and one of the wrist injuries listed above.

*Note – You can go to a knees on the ground position (shown below) OR a complete pushup where the knees aren’t touching the ground

burpee

Step 5: Drive Your Hips and Bring Legs Back To Crouch Position

burpee_5

Step 6: Rise to Triple Extension (Ankles, Knees, and Hips) and Clap Overhead

burpee

If you’re unable to reach the full range of motion required of the upper body in step 4 pain free, then the odds are against you – you most likely have an injury or a mobility/flexibility issue. For the meantime, there are some modifications that can be made to your form that will remove some of the pain, and allow you time to take care of the underlying issues. Stay tuned for future articles where you can learn how to finally remove some of that pain, and finally get rid of it for good!

Categories
Nutrition Uncategorized

Healthy Meal Ideas for College Students

If you want to get away from the school cafeteria a bit, and have a place where you can prepare quick meals, than this article is for you.

I will outline several of my favorite recipes in this article, and the full descriptions can be found at the link at the bottom.

NOTE: These Recipes are for those who are open to different foods (these are not traditional recipes)

Recipe 1: Chorizo Sweet Potato Chili

I’ve always been a big fan of chili – I love any food that is spicy, but what I really like about this recipe is it’s not only extremely healthy for you, it’s delicious.

*Quick Tip* Spicy Foods Help Increase Your Metabolism

The sweet potato provides tons of great carbohydrates for you, and the beans give you healthy fats. which will leave you full and relieving you of snack cravings later on.

Recipe 2: Chunky Lentil and Vegetable Soup

Okay, I’m kind of a sucker for chilis, soups, and stews. Coming from a cold climate, I always like a hot dish that will warm me up during the winter months. However, this dish provides you with a great variety of different foods, and a lot of food too. It’ll leave you feeling stuffed AND feeling good about the healthy food choice you just made.

Recipe 3: One Pot Sausage & Mushroom Pasta

Pasta isn’t the best dish for you if you’re trying to drop the pounds, but I had to throw this one in. Who doesn’t love pasta and red sauce right?

You can make a huge amount of this in one session of cooking, and bring it back to your dorm and stick in your fridge for later. This is great to share with your friends on your dorms (especially if their scavengers).

You can find more recipes and the actual recipe descriptions at the link below!

http://www.budgetbytes.com/2014/08/top-10-recipes-for-college-students/

Categories
Uncategorized

Principals of a Dynamic Warm Up

What is a Warm up?

If you don’t know what a warm up is, you have either never trained before in your life, or you have been living under a rock for the past 50 years. While most people do know and appreciate the importance of a warm up, the majority are either too lazy to do them, or they perform them incorrectly, SO incorrectly that in some cases, it may be more beneficial to not warm up at all. In this article, you’re going to learn when and how you should warm-up your body, and when and how to stretch.

For those of you who aren’t as familiar with what a warmup is, here is what Tim Roberson of STACK.com has to say:

“The main purpose behind [a dynamic warm-up], in addition to increasing the blood flow to the exercise musculature, is to increase the nervous system awareness. You’re trying to stimulate that awareness to the [exercises] that are going to follow. It’s the stepping stone before you actually start doing [more] intense exercises.” (STACK)

This definition really only tells half the story. The next half of a warm-up should consist of stretching. Only after our bodies have been primed, can we optimally stretch our muscles to illicit the best performance in the proceeding workout. So to summarize, here is how we should feel after our warmup:

-Increased Body Temperature

-Improved Joint lubrication

-Engaged Nervous System

-Improved Flexibility

-Grooved Movement patterns (Gentilcore)

What Am I Doing Wrong?

We need to get one thing straight here. The warm-up is exactly what it is, a warm-up. It should be specific to the work that is going to be done in the workout, but it should NOT be THE WORKOUT. Movements that are extremely intense, or put large amounts of stress into the muscular and nervous systems, should not be in the warm-up. These include: Max-Effort Plyometrics, Sprints, or high-intensity strength training. These movements can not be performed safely in a warm-up, because in order to execute them properly, we need an engaged nervous system, improved flexibility, increased body temperature, etc., which are all things we are trying to achieve with the warm-up.

I can’t tell you how many times I have seen people going straight to static stretching after sitting in a classroom for six hours. Have you ever tried to pull an uncooked steak apart? It doesn’t happen. If you heat it up, the steak is much more pliable. The same principal is true with our muscles. Without getting into the physiology of stretching, I will tell you that you can easily pull a muscle (over-stretch), and/or won’t be optimally preparing yourself for the work to follow, without an increased body temperature.

What SHOULD I DO?

Don’t worry, although I just picked apart your whole stretching routine, chances are you can keep it. As long as you do the following before your stretch, you should be golden. You need to do a dynamic warmup. In a dynamic warm up, exercises should be specific to the upcoming workout. It should begin with lower intensity, single-joint movements and progressively move towards medium-intensity, multi-joint movements. (Cressey) It can be preceded by soft-tissue work, but that is for a whole other article. It’s important to work areas such as the ankle, hip, and thoracic spine. (Cressey) The reason being is, for most of us who are sitting at a desk all day, these areas tend to be the tightest. Another factor to point out would be that these three areas have a tremendous amount of responsibility in some of the most basic functions of movement, such as twisting, bending, extending, pushing, and pulling.

EVEN WHEN YOU ARE WARM, STRETCHING CAN BE COUNTERPRODUCTIVE. Although this takes an individualized assessment, stretching phasic (lengthened or under-active) muscles will just worsen any postural imbalances you may have, and can lead to pain and injury. Stretching tonic (tight or over-active) muscles, will help balance postural alignment, and move the body closer to an optimal bio-mechanical position (Chek).

Group Warm-ups

When in a group setting, it isn’t realistic to assess everyone for their own postural imbalances. This can apply to boot camps, sports teams, and gym classes. In this case, the best we can do is stretch each muscle and it’s antagonist (opposite muscle). An example of this would be the bicep and tricep. Stretching both will maintain the current postural alignment, but still provide the benefit of increased flexibility in the muscle.

Should I Change my Warm-up on a Regular Basis?

Like previously mentioned, the warm-up should be specific to what’s going to take place in the main workout. It never hurts to add variety, however, but if your workout never changes, then generally, your warm-up won’t have to either. Of course, if your postural status is improving with corrective stretching and exercises, then your stretches will have to change as well.

Don’t Overdue It

There is one purpose to a warm-up, and we’ve already mentioned what that is. It’s to prepare for the main workout to come. Warm-ups that are too intense or are too long will actually take away from the main workout / competition / sports practice.

Remove Unnecessary Exercises

There are many coaches out there who will put high-intensity, low-volume exercises in their warm-ups. These exercises really deserve to be part of the workout themselves. Warm-ups generally should consist of exercises at a low to medium intensity at medium to high volume. The problems happen when you mix a high-intensity exercise with high volume. This is just asking for burnout and reduced performance in the actual competition / workout / sports practice.

Warm-ups are hardly ever changed, so if an athlete is practicing for their sport 5-6 times/week and they are using the same, high-intensity exercise over and over in their warm-up, they will eventually create some sort of postural imbalance, as well as fatigue quicker, and start to see diminishing gains. (Zatsiorsky, 96) If the coach is insisting on continuing the use of high intensity exercises, they should make sure to properly use, “rest-exercise alternation and proper exercise sequencing to alleviate fatigue.” (Zatsiorsky, 96).

Most coaches use isometric training on the field or on the court because it’s simple, doesn’t require equipment, and seems to get the job done. However, they should be aware that accommodation to isometric exercises happens quickly, and gains tend to peak between 6-8 weeks. (Zatsiorsky, 124).

If you’d like to learn more about prehab, preventing injury, and warming up correctly, Sign up in the form below! I’ll send you free content on how to improve all of these things, in the most effective way possible.


Sign Up Below To Get Access To More Free Content about Warmups

We respect your email privacy

Email Marketing by AWeber

Works Cited

Chek, Paul.How to Eat, Move and Be Healthy!: Your Personalized 4-step Guide to Looking and Feeling Great from the inside out. San Diego, CA: C.H.E.K. Institute, 2004. Print.

Cressey, Eric. “The 6 Characteristics of a Good Dynamic Warm-up | Eric Cressey | High Performance

Training, Personal Training.”Eric Cressey. N.p., 20 Dec. 2011. Web. 22 Nov. 2013.

“Dynamic Warm-ups vs Static Stretching.”STACKSept. 2008: n. pag. Web.

Gentilcore, Tony. “The Perfect Warm-Up.”Tony Gentilcore. N.p., 23 May 2012. Web. 22 Nov. 2013.

N.p., n.d. Web.

Zatsiorsky, Vladimir M., and William J. Kraemer.Science and Practice of Strength Training. Champaign, IL: Human Kinetics, 2006. Print.

Categories
Personal Development Uncategorized

I Won The Lottery, and So Did You

What do you mean I won the lottery, Hunter?

That’s what I thought until I decided to not sleep ALL night and watch a one hour speech by Warren Buffet, the CEO of Berkshire Hathaway who’s net worth is 73.5 Billion Dollars.

In his presentation, he was asked the question, “What is your take on Social Security and the Welfare System?”

His answer really takes everyone’s best interest into account, and that’s why I wanted to share this with you today.


NOTE: These aren’t his exact quotes – just as I remember

When he was asked this question in front of over a hundred high school students, he replied with this answer:

“Well first things first, we all won the lottery… when I was born I had a 1 in 50 chance to be born in the United States, and I was fortunate enough to be born here. You guys have also won the lottery, so you’re already ahead of the game.”

That statement right there was a big eye opener to me in itself. Yes, I’m grateful that I live in this country, but when you really get to the numbers (1 in 50) although I’m sure the numbers have changed since when he was born, it really makes an impact.

He continues…

“Imagine if, 24 hours before you were born, a genie came to you and said, “you’re about to be born in 24 hours, and you can create the world however you want it.”

“What’s the catch?”, you’d say.

The genie would reply back, “Here’s the catch… you don’t know if you’re going to be male or female, white or black, smart or stupid, healthy or have a crippling disease, what country you’re to be born in, or if you’re born rich or poor.””

This reply to the question Warren Buffet asked is about the best answer I think he could have given. Obviously, everyone’s interpretation on this is different, but it does really take into perspective everyone elses positions.

Personally, I don’t get caught up in all of the politics that go into social security and welfare, but I am aware that a lot of people complain about it.

It impacts my life in that my mother is very ill and does have a very deadly disease that she was born with. Luckily, it’s not as severe as it could be, but the medical bills aren’t cheap. She worked her entire life as a nurse and helped thousands of people, and she didn’t stop until her doctors told her she had to.

However, a lot of people abuse the system too, and it is FAR from perfect. Warren Buffett acknowledges this but claims that it is constantly improving.

I’m not going to get into this debate, but I really just wanted to share Warren Buffett’s viewpoint on this because it really made me appreciate what I have a little bit more. I hope it did the same for you.

You can watch the full interview below: